It’s About Time, and Reclaimed Wood

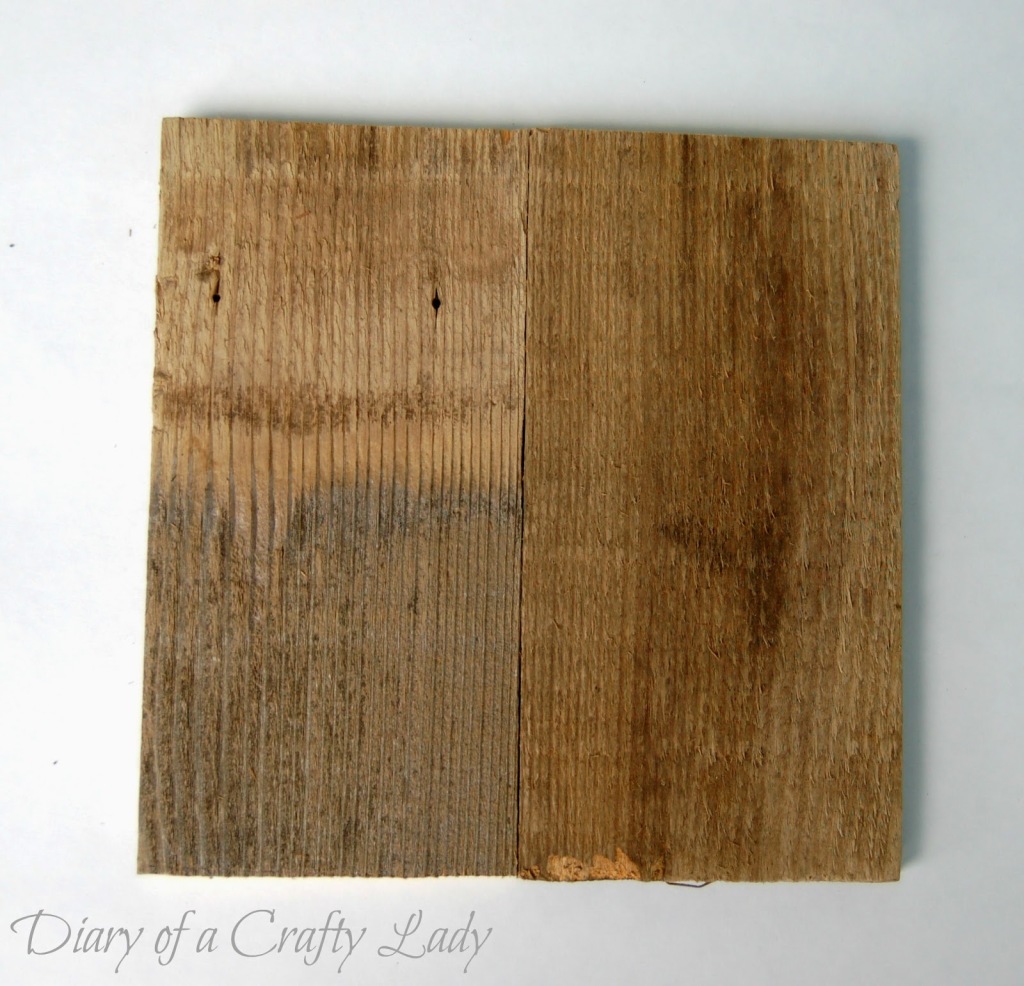
“A few months ago I was riding bikes with my girls, and saw a neighbor down the street taking out a huge fence in order to replace it with a new one,” Lindsay begins the story of her latest rescue at Diary of a Crafty Lady. “After riding back and forth a few times I got up the courage to talk to the neighbor, and found out that he was taking down a fence made of cedar, and was willing to give me several pieces of fence board!”

reclaimed-wood-piece

With all the possibilities of reclaimed wood projects before her, Lindsay decided this one should be….a clock. She cut some of the wood down to form a square. Lindsay burned numbers into the face of the clock. She used scrap cedar to make a simple frame, then added hands to finish off the clock. What a neat, rustic timepiece! I love that it’s made of so many reclaimed items!

woodburned clock from reclaimed wood

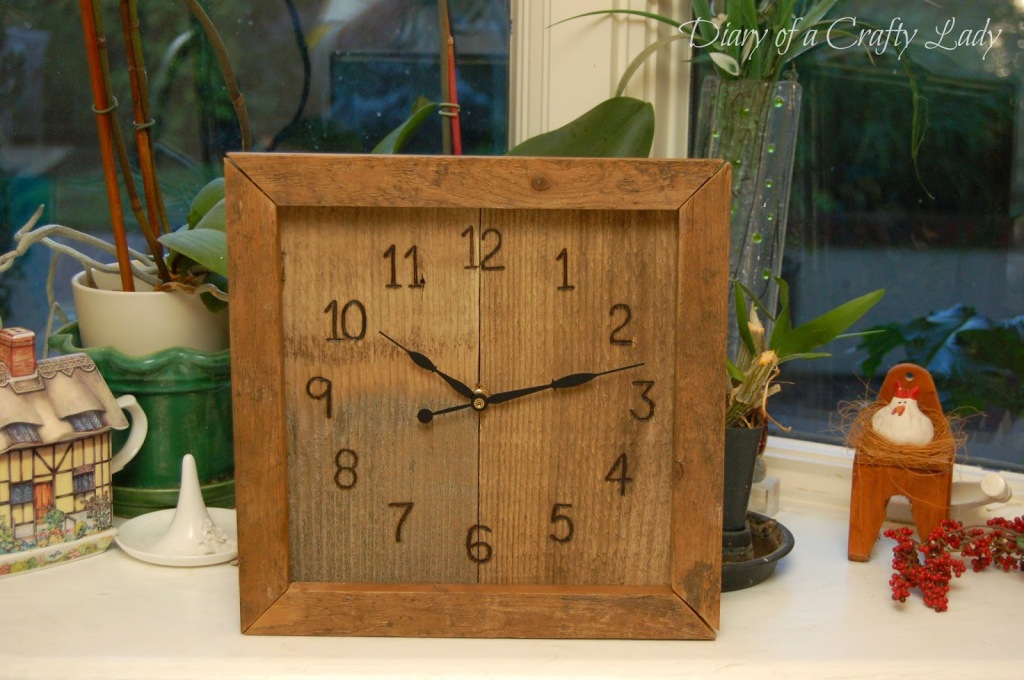
Visit Diary of a Crafty Lady to see Lindsay’s tutorial for this project.


Mid Century Mod Dress Update in Gold and White

“This dresser was part of my bedroom set growing up,” Abby explains at Just a Girl and Her Blog, “and I took it with me when I left my parents’ house and never gave it
back.” She’s used the dresser in different ways around her house, even painting it black several years ago, as you see in the picture below.

mcm-dresser


“I was in the mood for a change recently,” Abby admits, which inspired this makeover. Since the black paint was showing every nick and finger print, and hiding some of the fun mid-century-mod details, she decided to go with a lighter look. Abby painted the dresser glossy white, then accented the drawer pulls and legs with gold paint. It looks fantastic!

gold-white-dresser-makeover

Get the details on this dresser transformation at Just a Girl and Her Blog.

Dresser to Coffee Table Transformation

Over at Lake Girl Paints, Deb has been working some furniture makeover magic. It all started with a dresser passed down from Grandma.

dresser-top

The dresser had some gorgeous lines, but had too much water damage on the bottom half to be used as it was. Instead, Deb cut it down to coffee table height and added some simple legs. She sanded and stained the old dresser. Next, she painted the box around the drawers a vintage white, sanding the edges for a worn look. Leaving the drawers and top stained gave the coffee table a two-tone finish that looks great in Deb’s living room!

Dresser into coffee table

Get all the details on this dresser turned coffee table at Lake Girl Paints.

Fabric Scraps Become a Cool Clutch

Nicole from The Felted Fox is back with another refashion for us. This one made use of the scraps leftover from this exotic tribal pillow project that she shared with us here.

Indian-tribal-pillow

Bonus with this project: Nicole says it can be made in less than an hour! She simply used the leather and fabric scraps that she had on hand to sew this simple clutch. She even shares a handy printable template that you can use as a pattern if you’d like to make a clutch like this one. Nicole’s new clutch is so chic!

tribal-print-leather-clutch

Get detailed instructions for this project at The Felted Fox.

Old Door Becomes a Shabby Chic Mirror

Over at Thrifty Treasures, Sara figured out how to turn a hollow core door into so much more. “These doors are usually passed up,” she tells us. They aren’t old, or wood. or anything special, but there still are some things you can do with them.

hollow-core-door

To transform the door she found, Sara glued an inexpensive mirror onto it. She added molding around the mirror and added a wood applique. After everything was dry, Sara painted everything white and then sanded the edges to give it a distressed look. Now the old door is a dressy full-length mirror for her bedroom!

Shabby-Chic-mirror-from-hollow-core-door

See exactly how Sara transformed this door into a shabby chic mirror at Thrifty Treasures.

Wood Pallet Wall Decor

When DeDe of Designed Decor wanted a little something new to brighten up her wall, she went shopping in her own garage like the rescue queen she is! Leftover pallet pieces and baseboard trim became the star of this shabby chic wall decor.

Pallet-Wall-DecorDeDe stained, painted, and sanded the pallet pieces to give it a “shabby washed look.” She cut the baseboard and nailed the pieces together to form the frame, then sanded, painted, and sanded the frame again. Coat hooks made the finishing touch and open up lots of options for storage or display. DeDe says, “I love how simple it is to take a few scrap pieces and turn it into something fun and functional.”

Pallet-Wall-Decor-pinnableCheck out the rest of the project at Designed Decor.

Pallet Christmas Tree

Julie at Redhead Can Decorate saw a simple pallet Christmas tree last year that got her gears turning. When fate delivered a pallet to her house last summer, she hung on to it and is now the proud owner of a gorgeous silver and gold pallet tree!

wood palletAfter cleaning off the dust and removing some, ahem, tiny spider residents, Julie gave the pallet a light coat of paint. She used nails to create the Christmas tree shape, then wrapped foil garland and lights around the nails, zigzagging down the pallet. A thrift-store star for the top and a sawed log for the bottom finished the project, and now Julie has a Christmas tree she is absolutely in love with.

silver and gold Christmas tree from wood palletTo see the full tutorial, visit Redhead Can Decorate.


Christmas Ornament Makeover

When it comes to Christmas and color schemes, Alexis at Persia Lou suffers from a bit of “Christmas tree ADD.” She says, “Pretty much every year I feel the need to change things up a bit . . . or change things up a lot. Which, of course, can get pretty pricey.” But this year she had an epiphany and gave some of her old ornaments a so-easy-you-won’t-believe-it makeover.

blue Christmas ornaments

Alexis says, “Several years ago I had an all blue and silver tree, and that was fun, but these blue ornaments just aren’t working with the white and gold thing I’ve got going on this year.” She grabbed a can of metallic gold spray paint and a few coats later she’s gone from Blue Christmas to 18 Karat Christmas! Even the glittery ornaments took the spray paint and kept on glittering. I don’t know about you, but I’m feeling inspired!

Christmas ornaments spray painted goldCheck out Persia Lou for more details.