Paint Swatch Heart Art

Guys, you know all of those paint swatch cards you have kicking around from trying to choose paint for various projects? Or that you can’t help picking up every time you walk past the paint display at your local hardware store. (Not that I’d know about that, ahem.) Well, Abbey has a great way for you to get some use out of those swatches, over at The Cards We Drew.

The Cards We Drew pink paint swatch cards

Abbey made this adorable art project for her daughter’s nursery, but I think it could be great for Valentine’s Day decor, too. She gathered all of the paint sample cards she’d collected when trying to decide on a shade of pink for the nursery walls, and used a heart punch to cut heart shapes out of each color. Abbey had a piece of wood leftover from another project that she cut into a square and painted with teal pearlized paint. She gently folded each heart to give them some dimension, then glued them onto the wood square in the shape of a hot air balloon. A little more paper and some twine created the passenger basket, and the heart art was ready for display. Adorable!

The Cards We Drew nursery paint swatch art hot air balloon

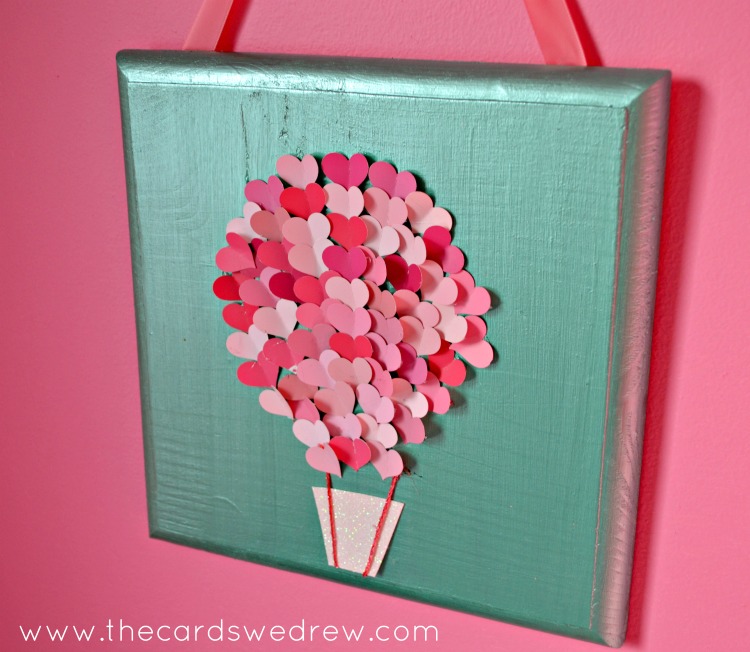
Go over to The Cards We Drew to get all the details on this cute project.

Coffee Filters Make a Fanciful Garland

When Laura of Laura Kelly Designs got a Keurig coffee maker, it made the stack of coffee filters in her cupboard obsolete. Instead of throwing them away, she made a garland in shades of green-perfect for St. Patrick’s Day!

coffee filters

The first step in making this pretty garland was to change the coffee filters from their original white state into a green one. Laura used Rit dye in two shades of green (apple and dark) for this. She made simple dye baths and dipped the filters into them, then let the filters drip and dry. While the filters were drying, Laura cut shamrocks from glittery green scrapbook paper and circles of black and white newspaper. Once the green coffee filters were ready to use, she layered them together with the newspaper circles, flattened cupcake liners, shamrocks, and buttons, stitching through the buttons with a needle and thread to hold everything together before tying them onto a long ribbon. What a pretty garland! With different colors of dye and paper, you could easily make these for other holidays, as well.

Laura Kelly Designs coffee filter green garland

Visit Laura Kelly Designs to get all the details on how she put together this garland from unused coffee filters.

Old Book to Football Fan Smash Book

At Diary of a Crafty Lady, Lindsay shares one of the projects she worked on for a special Christmas surprise this year. For an aunt and uncle who are die-hard college football fans, she created a fun memory keeping “smash book”. And she made it by upcycling a book no one wanted!

Diary of a Crafty Lady smash book before

Smash books are a really fun scrapbooking concept. As Lindsay explains, they are ” lots of pictures, words, little scraps of things you want to keep, all smashed onto pages, piled high, overlapping. Anything that helps you remember, and is meaningful, is meant to go inside. It is a lot of fun!” Since this book was meant for keeping memories from favorite football games, Lindsay picked an old book that had a cover in colors of the team her aunt and uncle root for. She pulled out the book pages, replacing them with binder rings and cardstock, and got things rolling with the smash book theme by adding a few memories for them, lifted from their Facebook pages! Such a fun idea-I’m sure Lindsay’s aunt and uncle will have a great time with this.

Diary of a Crafty Lady smash book after

Visit Diary of a Crafty Lady to find out how to turn an old book into a smash book.

Twig Heart Trivet

At Stow & Tell U, Amy used twigs from her yard to craft some neat things during the Christmas holidays. She had so much fun then, she decided there was no reason she couldn’t have more fun with twigs for Valentine’s Days. After all, there were plenty of twigs just sitting in the woodpile, waiting to be used for kindling.

Stow and Tell U twigs before

For this project, Amy suggests using twigs that are about the size of a pencil in diameter and are more straight than crooked. Before she works with her own pile of twigs, she put them in the oven for a few minutes to chase out and kill any bugs they might be harboring. Next, Amy cut a cute heart shape out of cardboard and painted it a fun shade of red. The last step was breaking the twigs to fit and gluing them onto the heart shaped cardboard. Now, the twigs are a cute heart-shaped trived, perfect for serving hot dishes to your sweetheart on a cold winter day!

Stow and Tell U twig trivet after

Visit Stow & Tell U to get complete directions for this twig trivet.

Clementines + Comic Books = Fun Storage

When a blogging friend challenged Susan from Organized 31 to upcycle a clementine crate, Susan was up for the challenge! She had an empty, wooden clementine box on hand, and decided to craft a project for an underserved population when it comes to benefiting from her blogging projects: the men of her family! She even got her son involved with this one.

Organized 31 clementine box before

Susan started out by collecting a few comic books that she knew she wouldn’t get in trouble for tearing apart. Next, she and her son removed the label from the clementine box, and painted it a cheerful red both inside and out. After the paint had dried, they selected colorful squares from the comic pages, cutting them out and decoupaging them onto the outside of the box as they went. Not only did Susan’s son have fun helping with this project, he now has a place to store his favorite action figures. Bonus!

Organized 31 clementine box after

Visit Organized 31 to learn more about this rescued clementine crate.

What’s Black and White and Read All Over?

When Kareny from The Salvaged Boutique spotted this chair sitting curbside on trash pickup day, she had no idea of the adventure that was ahead. She simply took it home, and decided that the black scrap of fabric she had would make a new seat if she just painted the wood parts of the chair white.

The Salvaged Boutique decoupaged chair after

Easier said than done! Karen sanded and primed the chair, but when she tried to paint a topcoat of white, the paint turned into a drippy, gloppy mess. She was forced to rethink the makeover. Deciding to forgo any more painting, Karen remembered some fun gift bags she had that were printed to look like vintage newspaper. She cut the bags into strips and decoupaged the paper onto the wooden parts of the chair. She left the black metalwork as it was, and replaced the cushion with the black fabric she originally planned to use. The “new” chair looks fantastic, and is definitely more interesting than what Karen had first planned.

The Salvaged Boutique decoupaged chair before

Visit The Salvaged Boutique to learn more about this rescue.

Love Letter Box

Just in time for Valentine’s Day, I’ve got a rescue with a romantic story from Jeanie at Create & Babble. This rescue starts out in the most unromantic way, however: with a daughter clearing out her childhood room as she headed off to college. Jeanie spotted a jewelry box in the chaos, and says, “I rescued it from the throw-away pile knowing that someday I would do something with it.”

Create and Babble jewelry box before

Well, when her husband found a stack of ribbon-tied love letters written by his parents over 70 years ago, Jeanie knew exactly where to store the special momentos. She pulled out the old jewelry box, and went to work on a makeover. She used Miss Mustard Seed Milk Paint in Ironstone to paint over the original finish. After two coats of milk paint had dried, she lightly sanded the box to give it a chippy, aged look before brushing on white wax. Inside the box, Jeanie used her craft cutting machine to make a silver vinyl monogram of her in-laws’ ininitials. She printed copies of some of the photos that were inside of the letters, and put those in the photo frames on the lid of the box. Now she has a box with vintage appeal to store these precious keepsake letters.

Create and Babble jewelry box after

To learn more about this project, visit Create & Babble.

Wooden Spool Gets a Book Loving Redo

At Our House, Now a Home, Emily shares a terrific rescue project. “I got this spool as a freebie when I was picking up some chairs
from a craigslist post,” she explains. “It was going to be thrown out” Emily had a feeling that she could turn it into something amazing, so she brought it home and did just that!

Our House spool before

Since the shelf they had been using to store children’s books was broken, Emily was looking for another book storage option. She cut out a circular shelf from 1/2 inch plywood. She used 3/4 inch dowel rods to hold the shelf in place. Once the shelf was constructed, Emily painted the whole thing white. Now it pulls double duty in her study as both a bookshelf and a small table. “It holds roughly 90 books,” she says of the newly finished shelf. Awesome!

Our House spool after

Click over to Our House, Now a Home to get all the details on how this spool became a bookshelf.